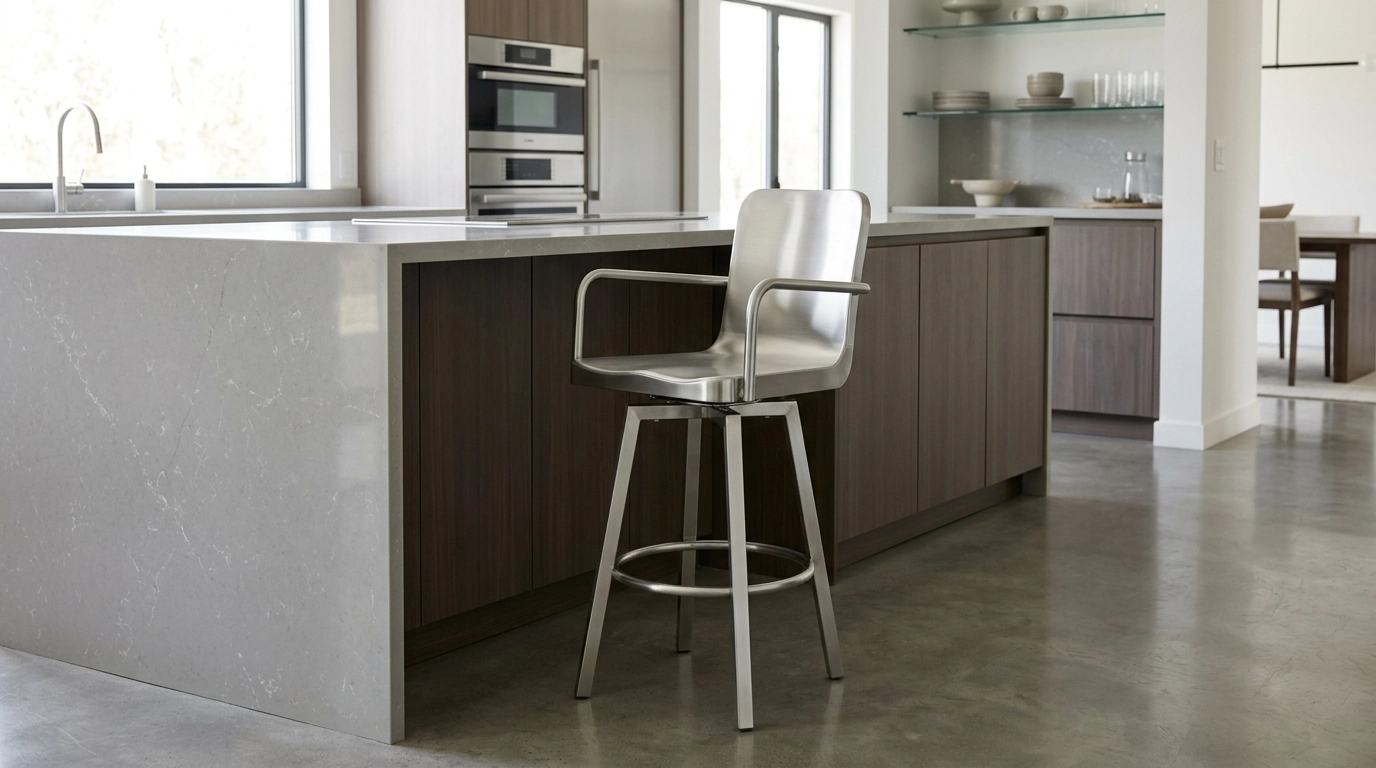
A stainless steel swivel bar stool with integrated handrails brings a clean, architectural look while adding practical support for getting on and off a higher seat. This style feels especially at home in modern kitchens and bar setups where sharp lines, reflective materials, and easy-clean surfaces matter. Below is a clear breakdown of what makes the design distinctive, where it performs best, and how to plan spacing, height, and care for everyday comfort.
The appeal of a minimalist stainless steel bar stool is how it balances a crisp, contemporary aesthetic with functional upgrades that make tall seating easier to live with day to day.
If you’re shopping for a streamlined metal option with added support, the Modern Minimalist Stainless Steel Bar Stool with Handrails – Rotatable, High Bench Design is designed specifically around that high, supportive seating experience.
Because stainless steel reflects light and keeps a narrow visual profile, these stools can make a seating zone feel lighter—useful in open-concept homes or smaller footprints.
| Planning item | Recommended target | Why it matters |
|---|---|---|
| Space per stool | Approx. 24–30 in (61–76 cm) of counter width | Prevents elbow bumps and improves swivel clearance |
| Behind-stool clearance | Approx. 24–36 in (61–91 cm) walkway | Allows easy passage when seats are occupied |
| Swivel radius | Keep edges and cabinets clear | Avoids knuckles/handrails contacting walls or islands |
| Floor protection | Use felt/glides where needed | Helps prevent scratches and reduces noise |
With high seating, comfort is mostly a measurement game. Start by measuring from the floor to the top of your counter or bar, then plan for leg room and overall clearance.
Handrails and swivel seats can make tall seating feel more approachable—but they work best when the surrounding layout supports them.
For floor-care best practices—especially for real wood—reference the guidance from the National Wood Flooring Association.
For a warm contrast elsewhere in the home—especially if you want a wood tone that complements stainless accents—consider the Cinnamon Cherry Finish Computer Desk with Storage as a coordinating piece for an adjacent workspace or open-plan area.
For broader stainless steel care guidance, see recommendations from the American Cleaning Institute.
| Situation | What to use | What to avoid |
|---|---|---|
| Fingerprints/smudges | Microfiber cloth, warm water | Paper towels that can leave lint |
| Grease or food residue | Mild dish soap + water | Abrasive scouring pads |
| Water spots | Dry cloth after cleaning | Air-drying in hard water areas |
| Deeper shine refresh | Stainless steel cleaner (as directed) | Chlorine bleach or unknown solvents |
Explore the details here: Modern Minimalist Stainless Steel Bar Stool with Handrails – Rotatable, High Bench Design.
It can if grit gets trapped under the base or if the stool slides without protective glides. Use felt pads or floor-safe glides, keep contact points clean, and check periodically for uneven wear that could expose harder edges.
Plan about 24–30 inches of counter width per stool, then add extra “breathing room” if the handrails are wide or the stools swivel near walls. If your space has heavy traffic behind the seats, lean toward the wider end for easier movement.
Use a microfiber cloth with warm water or mild soap, then dry immediately to prevent water spots. If the finish is brushed, wipe in the direction of the grain and avoid abrasives or harsh cleaners that can leave dull patches.









Leave a comment